Showing posts with label Easter. Show all posts

Monday, April 26, 2010

Orange cheesecake with raspberry sauce

We've never really done anything big for Easter. This year, because of my newfound pregnancy-induced nausea, we didn't even do anything big for Christmas. (Good thing we blew out Thanksgiving since we found out we were expecting four days later!)

Even though I've been feeling better, I've still been exhausted from working two jobs and taking a class. I wanted to keep Easter low-key, food-wise, and had to work Easter afternoon at my full-time job, anyway.

But I did want to bake something new.

I asked my husband what he wanted for an Easter dessert. I was thinking a cream pie. Or an elaborate cake. He suggested "jelly beans and Peeps." Sigh. I asked him to be serious. He responded with "chocolate bunnies."

It seemed I was on my own.

I came home from my part-time job and made some lunch. I looked over at my cookbooks, uninspired. I figured I'd do some hunting on the internet later that day for the perfect recipe. I changed the calendar - it was April 1, after all - and was hit by baking inspiration.

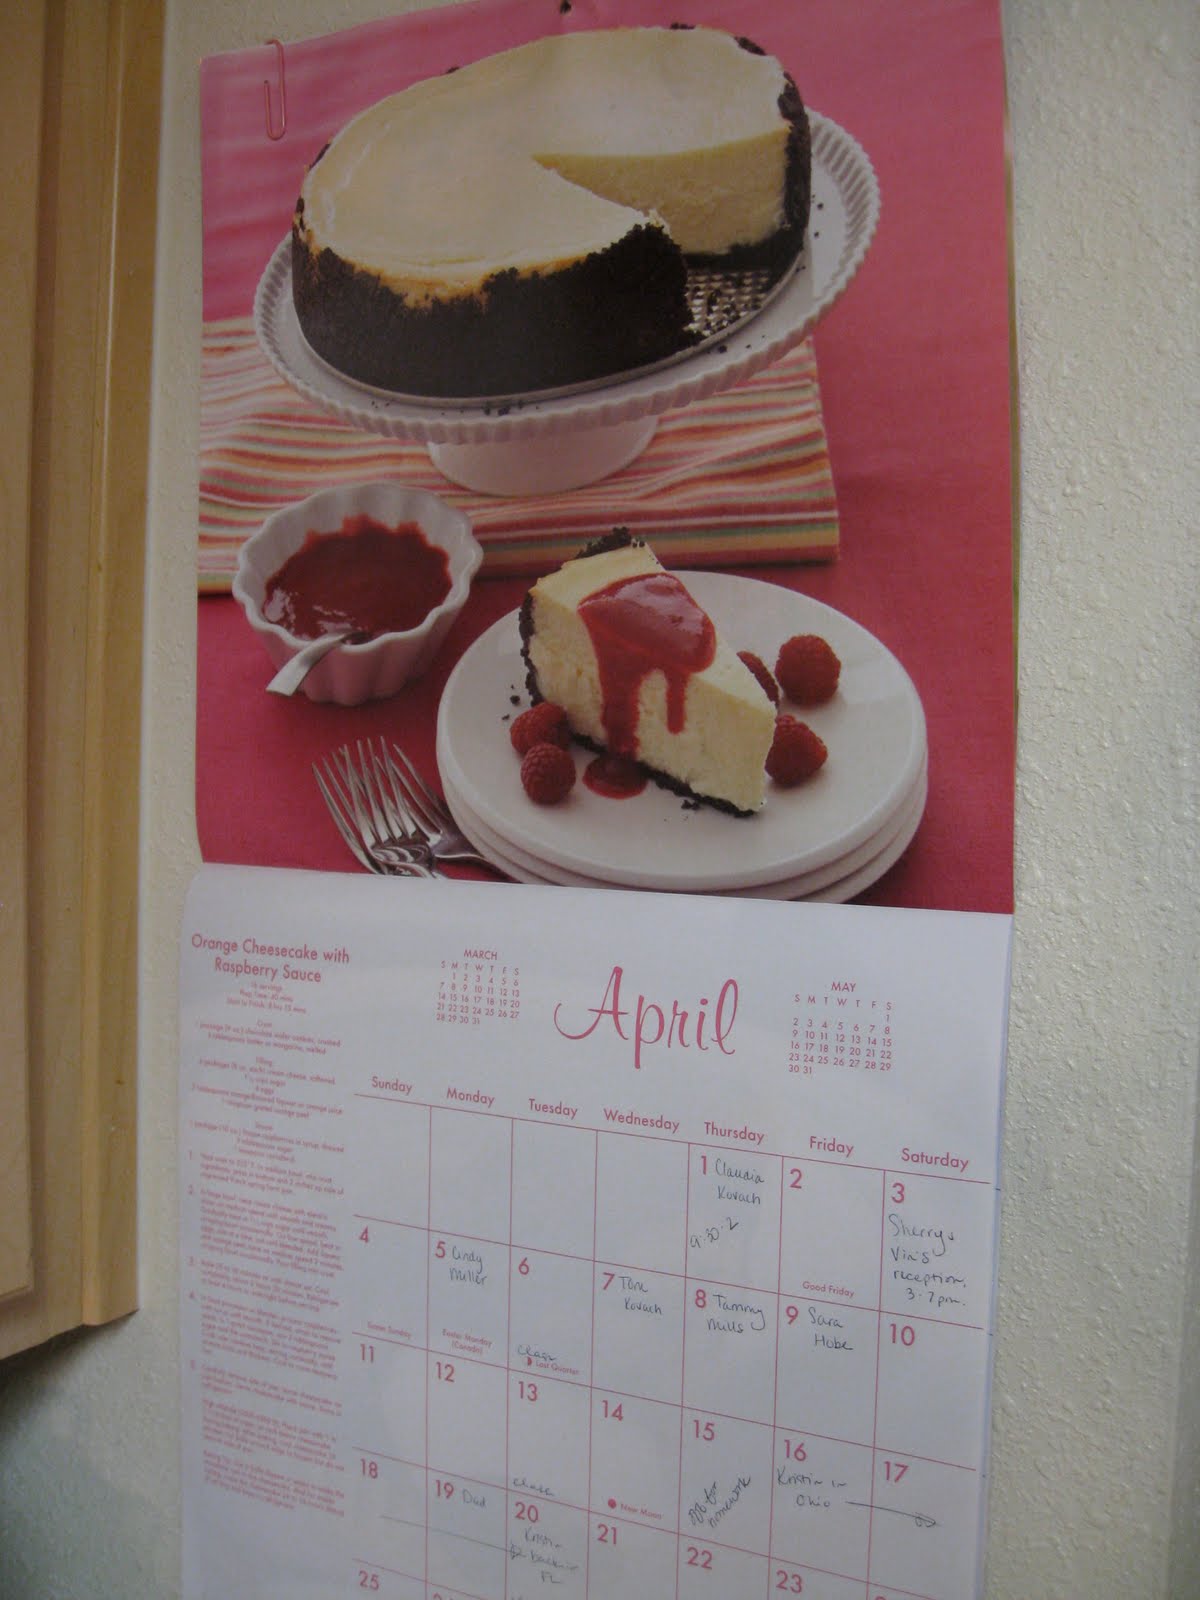
I bought this calendar for 80 cents at Michael's in late December. I hadn't found *the perfect* calendar and figured this one, with a delicious recipe every month, would work perfectly in our kitchen. I've drooled over each month's offering, but this was the first one I actually made.

I ended up using strawberries instead of raspberries for the sauce (apparently there was an Easter run on frozen raspberries - who knew?). My frozen strawberries did not have sauce, so I used a bit of water to give them more liquid. And I used orange juice (I had it in the house) and no grated orange peel (for no other reason than I'm lazy). Not surprisingly, the orange flavor was virtually impossible to detect. It didn't matter, though - the cheesecake was delicious, and the sauce was a hit with my husband. I will definitely try to boost the citrus flavor next time I make this, but it was an easy, delectable cheesecake the way it was - and perfect for our Easter dessert.

Ingredients:

CRUST
1 pkg. (9oz) chocolate wafer cookies, crushed
6 T margarine, melted

FILLING
4 pkg (8oz) cream cheese, softened
1 1/3 cups sugar
4 eggs
2 T orange flavored liqueur or orange juice
1 t grated orange peel

SAUCE
1 pkg (10 oz) frozen red raspberries in syrup, thawed
3 T sugar
1 t cornstarch

Directions:


Heat oven to 325°F. In medium bowl, combine crust ingredients; mix well. Press in bottom and 2 inches up sides of ungreased 9" springform pan.

In large bowl, beat cream cheese at medium speed until smooth and creamy. Gradually add 1 1/3 cups sugar, beating until smooth. At low speed, add eggs 1 at a time, beating just until blended. Add liqueur and orange peel; beat 2 minutes at medium speed, scraping sides of bowl occasionally. Pour mixture into crust. Bake at 325°F for 55 to 65 minutes or until almost set. Cool 2 1/2 hours or until completely cooled. Refrigerate at least 4 hours or overnight.

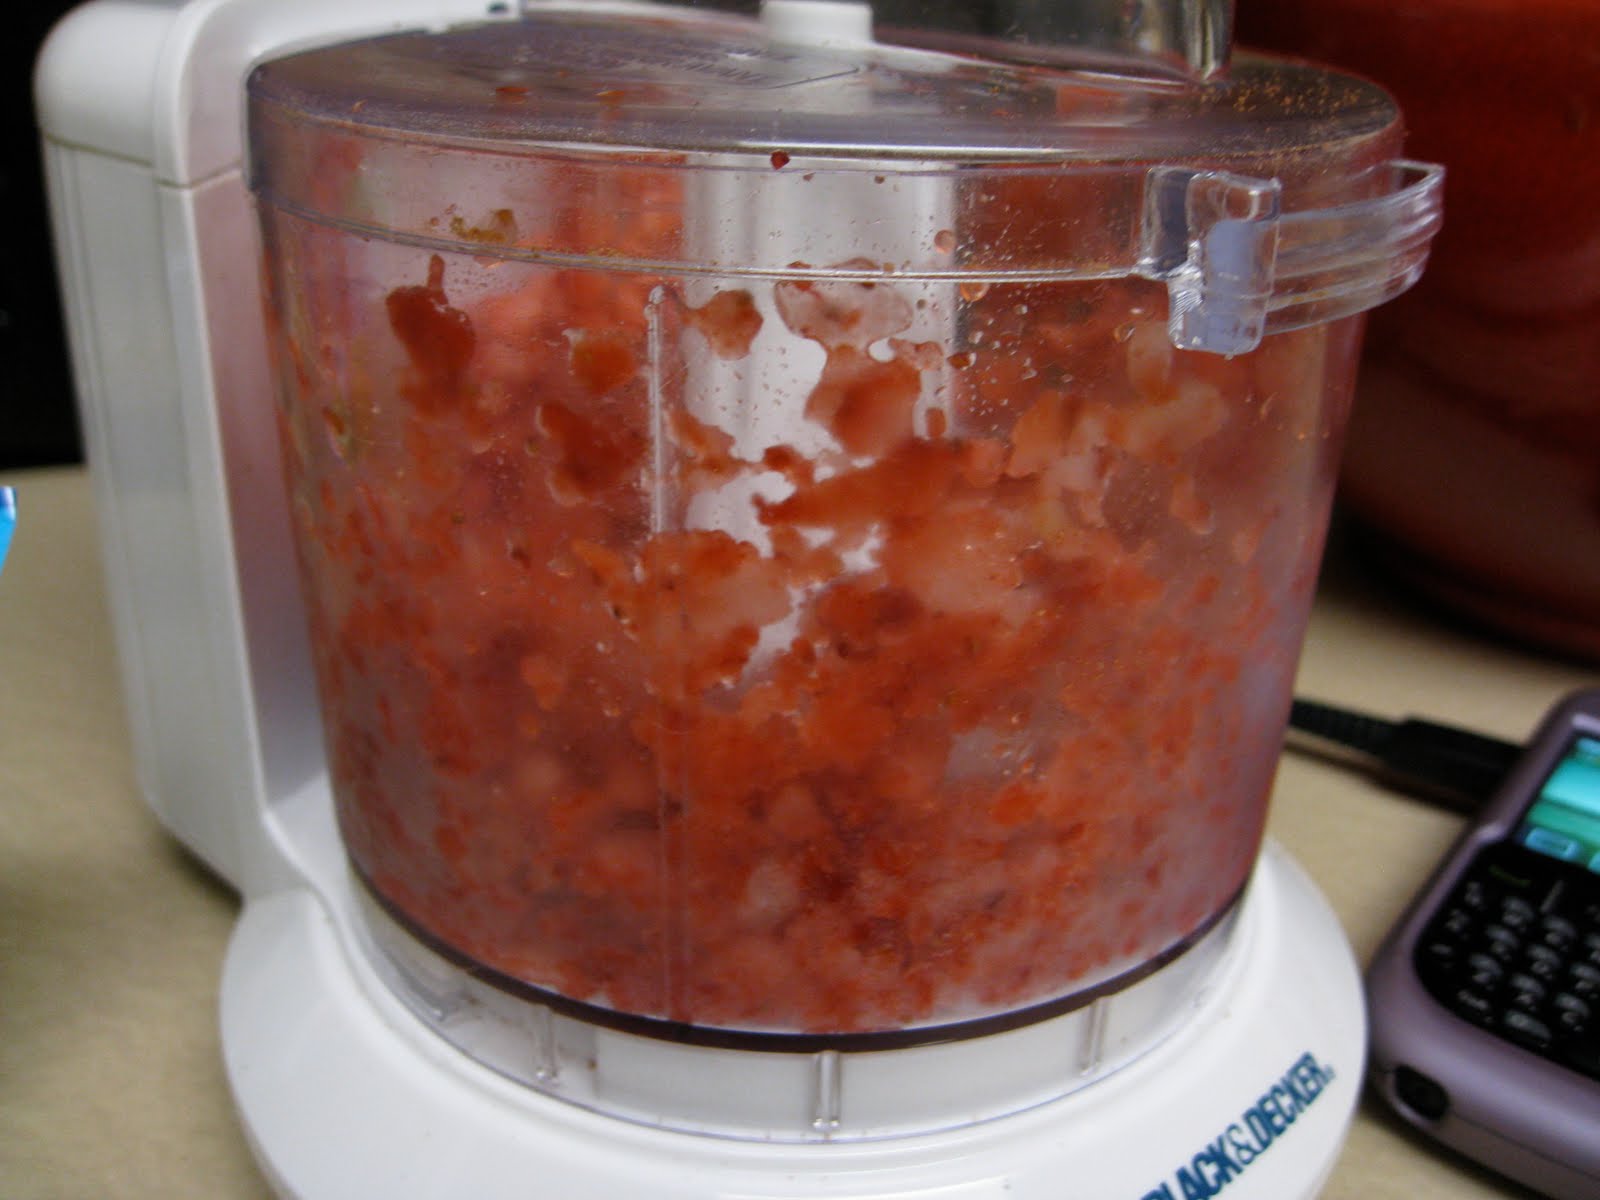
In food processor bowl with metal blade or in blender, process raspberries with syrup until smooth. If desired, strain to remove seeds. In small saucepan, combine 3 T sugar and cornstarch; stir in raspberry puree. Cook and stir over medium heat until mixture boils and thickens. Cool to room temperature.

Just before serving, carefully remove sides of pan. Serve cheesecake with sauce.

Source: 2010 Pillsbury Dessert Recipes calendar

Friday, April 9, 2010

Easter Egg-stravaganza

I love Easter.

Every year, we have a group of friends over for Easter Brunch. We eat eggs, ham and fruit and watch whatever basketball game or bad movie happens to be on TV. We play a game. We drink mimosas (and beer and wine and... you get the idea).

I've had some form of this brunch every year since I moved to Arizona. My friends look forward to the green chili egg casserole. Mike gets revved up several days in advance for the annual peanut butter egg baking.

I'm not going to lie: I have struggled with these darn things. The filling is good - or so I'm told... I hate peanut butter and therefore have never tried them. I just have to trust that my husband is being honest with me. With the speed at which he devours them, I choose to believe him. But the chocolate coating... this has been my baking nemesis for the past several years. My recipe calls for melting regular milk chocolate chips. I have tried this several times, with several different dipping techniques, and the result is always the same: it's too gooey and too thick to work with, and the egg shells end up too soft and thick. Still tasty, I'm told, just not a proper peanut butter egg.

I improved my technique last year, but the chocolate shell was still too thick. It was time to call on my mother-in-law: the original peanut butter egg maker. Mike kept trying to explain how her eggs shells turned out (smooth, hard and thin), and I'll be darned if I could figure out how she was doing it. She let me in on the secret: You must use candy coating chocolate, like Merckens. But Merckens cannot be found in your regular grocery store baking aisle, unless you patronize a super cool grocery store. No, you must find a cake decorating store and buy it there.


a-HA! And so I found a cake decorating store (think Toys R Us for bakers), and I bought a ridiculous amount of the stuff. Because this year, I decided to branch out. This year, I was going to make butter cream and coconut cream eggs, too. Recipe courtesy of my mom-in-law, the best egg maker in the land. The butter cream recipe is the base for the butter cream and the coconut eggs:

Ingredients

1/2 lb. butter, chilled
1/2 lb. cream cheese, chilled
1/2 tspn vanilla
1/2 tspn salt
2 lbs. confectioner's sugar
Coconut, if desired
Dark chocolate Merckens candy coating

Directions

Combine the butter, cream cheese, vanilla and salt in a food processor or mix with a mixer. Blend confectioner's sugar into the mixture. You can add coconut or cocoa to the filling for a chocolate flavor. Refrigerate for 1 hour. Roll into small balls or egg shapes; refrigerate for another hour. Melt dark chocolate in a double boiler and dip the eggs into the chocolate (see technique, below).

The recipe for the peanut butter eggs is here.

Some notes

*I cut the butter cream recipe in half and made a batch of butter cream and a batch of coconut eggs. I'll be honest: the plain butter cream eggs were REALLY rich. And I'm saying that as someone who loves really sweet, rich desserts. I think they actually might be too rich for me (say it ain't so!). And the filling is a bit softer than the peanut butter and coconut varieties, which made them a little more challenging to dip. The coconut was enough to cut the sweetness, and I also liked the consistency and thickness of the filling on those better.

*The recipe makes a ton of filling, so next year, I'll probably cut the recipe in half and make just the coconut version.

*I'm not sure how much coconut I added. Quite a bit. Several handfuls. I would add a big handful, stir it up and taste it. I did that several times until the taste and consistency seemed right (full disclosure: this was my favorite part of baking the eggs).

*Want my awesome new dipping technique? This is a variation on what my mom-in-law does. I drop the egg in the chocolate, swirl it around until it is fully coated, and then scoop it up with a fork. I tap the fork on the side of the pan a couple of times to shake the extra chocolate off, and then I drop it onto wax paper.


*I used light chocolate for the peanut butter eggs and dark chocolate for the coconut. This is most definitely the way to go.

*Once they were set, I put the eggs in individual paper muffin cups. I used different colors so I could keep track of what kind each one was. I think it made them pretty.

Friday, April 17, 2009

A bit (ok, a lot) more about Easter

Each year, my husband and I have friends over for an Easter brunch. I'm not sure how Easter became "our holiday" to host, but I'm so glad it worked out that way.

Easter is awesome. It's an excuse to drink mimosas at 11 a.m., and practically all the food can be made ahead of time.
I bake a couple things the day before, then get up on Sunday morning to cut up a fruit salad and throw an egg dish in the oven, while Mike takes care of the potatoes and bacon. You don’t get much more low-maintenance than that.

On the menu this year:
* Green chili egg puff
* Bacon
* Potatoes (cut up and cooked in a frying pan with some onions – one of Mike’s specialties)
* Fruit salad (grapes, cantaloupe and FRESH pineapple = yum)
* Blueberry cake
* Zucchini bread
* Peach French toast, courtesy of my friend Kelly

Blueberry Ripple Cake
The blueberry cake is one of my go-to recipes (see recipe below). It has a cake-mix base with a simple homemade crumb mixture (and blueberries, of course) added in for texture. It tastes like it took longer to concoct than it actually did, and it’s a great dessert for the spring/summer, when you don’t want anything chocolaty or heavy.
Here's how it looks pre-oven:


And post-oven:

My tip: After it has cooled, store it in the fridge. It’s good at room temp, but it’s really good cold. I discovered this once when I made it for a visit from my mom, who lives in Ohio. We ate it at room temperature the first day, and since it gets hot in the desert, I stuck it in the refrigerator so it would stay fresh.
My mom still raves about it and calls it “that blueberry cake that tastes better when it’s cold.” She says the cold makes it “crisp,” which I think is a pretty good way to describe it.

Zucchini Bread
I started making the zucchini bread years ago, when I wanted to emulate my Grandma’s bread-making skills. The woman makes a mean pumpkin bread. I haven’t even bothered to attempt my own pumpkin bread because I know it won’t be better than hers. So I opted for zucchini instead (see recipe below).
I keep making it not just because it is moist and really good, but also because I love the color of the freshly grated zucchini the recipe calls for. See:

It’s a color you rarely see in baking. That’s just cool to me.
Here’s the finished product:

I put one out on the table for Easter, and sent the other to Mike’s Nana, who likes to have a piece with her morning coffee.
Some blueberry cake and zucchini bread remnants:


Green Chili Egg Puff
I don’t know how I forgot to take a picture of the Green Chili Egg Puff, but it’s a crowd favorite. One person from the group told me he looks forward to Easter specifically because of this dish.
I had the same reaction the first time I tasted it, which is why I snagged the recipe.
I was in Los Angeles with some friends, staying at the house of one of the friend’s parents. We got up one morning, and Mrs. Newton pulled the puff out of the oven.
It’s creamy, it’s cheesy, and it has a little southwestern flair. I asked her, hesitantly, how difficult it was to make.
Oh, she said, it's not hard at all! You just mix everything together and stick it in the oven!
She passed the recipe to me, and I scribbled it down, knowing it was a gem that I’d get a lot of use out of.

Blueberry Ripple Cake
Ingredients:
3/4 cup all-purpose flour
3/4 cup packed brown sugar
1-1/4 tspn ground cinnamon
1/4 tspn salt
1/4 cup cold butter
1/2 c chopped pecans
1 package (18-1/4 ounces) white cake mix
1/4 cups fresh or frozen blueberries

Directions:
In a large bowl, combine the flour, brown sugar, cinnamon and salt; cut in butter until crumbly. Stir in pecans. Sprinkle half the mixture into a greased 13 X 9 X 2 baking dish.
Prepare the cake mix batter according to package directions; spread over pecan mixture. Top with the blueberries and remaining pecan mixture; swirl with a knife.
Bake at 350 for 45-50 minutes or until a toothpick inserted near the center comes out clean. Serve warm or cool on wire rack. Yields: 12-15 servings.
(If using frozen blueberries, do not thaw before adding to the batter.)
Source: Taste of Home Cake Mix Creations

Zucchini Bread
Ingredients:
3 cups all-purpose flour
1 tspn salt
1 tspn baking soda
1 tspn baking powder
3 tspns ground cinnamon
3 eggs
1 cup vegetable oil (for a healthier version, substitute 1/2 c of the oil for 1/2 c applesauce)
2 cups white sugar
3 tspns vanilla extract
2 cups grated zucchini
1 cup chopped walnuts

Directions:
Grease and flour two 8X4 pans. Preheat oven to 325.
Sift flour, salt, baking powder, soda and cinnamon together in a bowl.
Beat eggs, oil, vanilla, and sugar together in a large bowl. Add sifted ingredients to the creamed mixture, and beat well. Stir in zucchini and nuts until well-combined. Pour batter into prepared pans.
Bake for 40-6- minutes, or until tester inserted in center comes out clean. Cool in pan on rack for 20 minutes. Remove bread from pan and cool completely.
Note: This yields two breads, so I often give the other one away or freeze it for another day. It freezes very well, although isn't quite as moist after it has been frozen.
Source: allrecipes.com

Green Chili Egg Puff
Ingredients:
5 eggs, beaten
1/4 cup flour
1/2 tspn baking powder
1/4 tspn salt
1 cup cottage cheese
2 cups shredded jack cheese
1/4 cup butter, melted and cooled
1 (4-oz) can diced chilies

Directions:
Mix all ingredients together in a bowl; stir in chilies. Pour into a well-buttered 8X8 baking dish. Bake at 350 for 35 minutes.
Serve alone or with salsa.
Yields: 4-6 servings
Source: Mrs. Newton.

Tuesday, April 14, 2009

The Peanut Butter Egg debacle

I hate peanut butter. I hate peanuts. I hate anything that has come into contact with peanut butter or peanuts.

It smells bad, it tastes bad. It's just bad.

I know, I know. You are astounded by the fact that anyone could hate peanut butter or peanuts. You've never heard of such a thing. I'm some kind of freak of nature.

Even so. I hate it.

But I married someone who happens to love peanut stuff, particularly peanut butter eggs at Easter. His mom used to make them each year when he was a kid, and since we now live 2,000 miles from our families, I realized years ago that this responsibility had fallen to me.

So once a year, I buy a jar of JIF and dig my hands into a big mound of peanut butter, powdered sugar, butter and milk to form the filling of the eggs.

Mike begins hovering almost as soon as the mixing begins. He throws around a lot of "How did you get to be so awesome?!" and "Ohhhhhh, lookin good!!"

Once the filling is formed into a couple dozen little egg shapes, they get frozen for an hour. And practically every peanut butter egg recipe I can find says something like the following:

"Dip eggs in chocolate, and place on wax paper to set."

Ok. But dip them HOW? My original recipe says to stick a toothpick in one end and dip into the melted chocolate. But I have experienced three issues with this:

1. Once the frozen eggs starts to unfreeze and get soft, they fall off the toothpick and into the chocolate. So, the first couple of eggs would dip ok, but by the 3rd or 4th, I would start to have problems.

2. The chocolate is so darned thick, and Mike doesn't like a ton of chocolate on his eggs. The filling is the main event, he says. You can't have too much chocolate. I would think he'd want a ton of chocolate to mask the gross peanut butter filling, but what do I know.

3. The toothpick leaves a dumb toothpick-size hole in one end.

I have tried freezing the eggs longer, to keep them harder. I have tried spooning chocolate onto the eggs (this doesn't give proper coverage).

I've even tried just throwing the darn things into the chocolate and pulling them back out (not pretty, and I ended up with chocolate fingers that got chocolate all over everything in my general vicinity).

This year, I went in search of paraffin. This waxy stuff gets melted in with the chocolate and is supposed to make it smoother and easier to work with, and has the added bonus of making the chocolate a little shiny. Very professional-looking.

I went to two stores and couldn't find the elusive paraffin. Sigh.

So desperate times called for additional improvisation. And I can't believe I didn't think of this sooner.

I mixed the filling, formed the eggs and froze them for an hour.


Then I took the eggs out ONE BY ONE (yes, I got chocolate on my freezer door, oops). I stuck a toothpick in them. I dipped them. I scraped off the excess thick chocolate with a spoon. I set them on wax paper.

I let them set for about 30 minutes, and then I removed the toothpicks and (here's the really genius part) I used a fingernail to spread a little extra chocolate over the toothpick hole. You'd never know it was ever there! Here I am, in action:


I know, you all probably thought of this years ago, but it was a major breakthrough for me.

I still have no idea how they taste (Mike seems to approve), but I think this is my best looking batch so far.


Here's the recipe, in case you want to attempt them:

Ingredients
* 2 cups powdered sugar
* 1 cup creamy peanut butter
* 1/4 cup butter
* 1 bag of milk chocolate chips
* Touch of milk, for moisture

Directions
* Combine powdered sugar, peanut butter, butter and milk (if needed for moisture) until blended. Shape mixture into several small eggs. Freeze for 1 hour.
* Place chocolate in top of double boiler. Melt over medium heat, stirring frequently until smooth. Using toothpicks, dip each egg into melted chocolate to cover, then lay on wax paper and allow to harden.

Source: Unknown

Blogger template 'PlainFish' by Ourblogtemplates.com 2008