Showing posts with label chocolate. Show all posts

Saturday, June 9, 2012

Peanut Butter Chocolate Bars
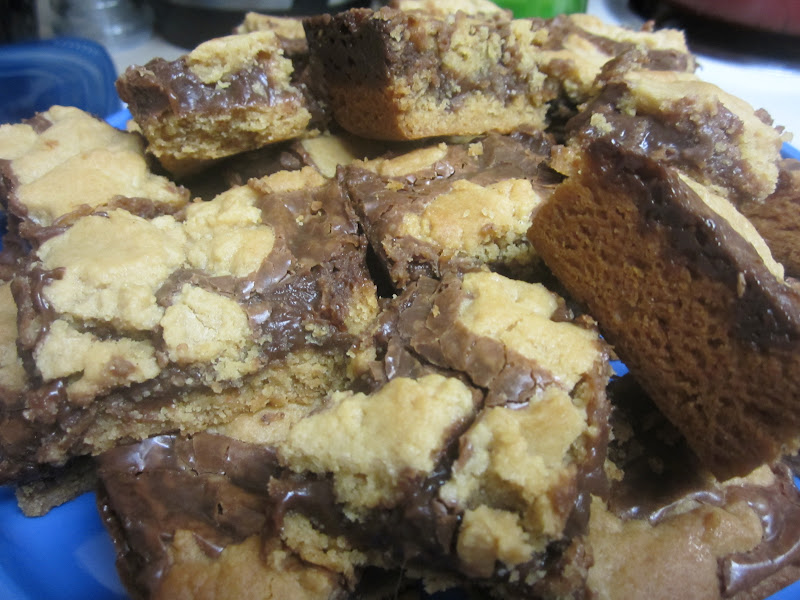
I realized a few weeks ago that while I have pinned many a things on Pinterest, I have done very little with any of them. I haven't crafted, read, fashioned, traveled, redecorated, cooked or baked anything from my boards.

I vowed to change that, and when the urge to bake struck me last weekend, I turned to my "Yummers" board. I found a few recipes that looked good and narrowed them down to what I had the ingredients for in my kitchen.

Enter these beauties. They were easy to make, wowed Tim and won over my coworkers. To describe them as "melt in your mouth" does no justice, and while I originally thought they'd be best serve chilled (as chocolate tends to melt in 5.7 seconds in the Florida summer), I strongly encourage you to try a melt-y bar. 


Ingredients:
1 (18.25) package plain yellow cake mix
1/2 cup butter, melted
1 cup creamy peanut butter (I used reduced-fat)
2 eggs
1 (12 oz) package semi-sweet chocolate chips (I used milk chocolate)
1 (14 ounce) can sweetened condensed milk
2 Tablespoons butter
2 teaspoons vanilla
1 cup coconut (optional)

Directions:
Preheat oven to 325 degrees.


Combine cake mix, melted butter, peanut butter, and eggs in a large bowl using a mixer or spoon. Press this into a 9X13 pan reserving 1 1/2 cup of the mixture to crumble on top.

In a small pot, melt chocolate chips, sweetened condensed milk, and butter. Remove from heat and stir in the vanilla and coconut.

Spread chocolate mixture over the mixture pressed in the pan and then crumble the 1 1/2 cups of reserved cake mixture on top evenly.

Bake for 20-25 minutes. Cool completely before cutting into bars.

Monday, December 26, 2011

Peppermint Bark

I bring you this recipe post-Christmas because I a) made my best batch of peppermint bark four days before Christmas and b) feel the need to give you a new use for all of the candy canes you can buy on clearance right now.

I had seen peppermint bark in a magazine recently and decided I needed to conquer my fear of melting chocolate and make it this year. When I was living with my parents, we had a double boiler and would melt chocolate to make buckeyes each year. Out in the real world, I have yet to purchase a double boiler and instead use a make-shift one when I make this cheesecake for my husband and think I just closed my eyes and crossed my fingers when I made the cake batter bark earlier this year.

But the chocolate-melting-without-a-double-boiler for this bark? Sooooo easy. I used Nestle morsels and followed the directions on the back for melting them. (The directions for the semi-sweet and milk chocolate chips vary slightly from the white chocolate instructions.) This didn't take long, and aside from messing up one batch because I was distracted by an extremely chatty husband (I didn't mix the candy canes in with the white chocolate and ended up sprinkling it over the melted chocolate), I was very pleased with the results. I made three batches, and my favorite by far was a milk chocolate/white chocolate combination. All of them were well-received.

Ingredients:

12 ounces (about 2 cups) dark chocolate, chopped, or chocolate chips
12 ounces (about 2 cups) white chocolate, chopped, or white chocolate chips
8 peppermint candy canes (I used 7-9)

Directions:

1. Unwrap the candy canes and place them in a food processor. Pulse on/off several times for 5-10 seconds each, until the canes have been crushed into small pieces. Alternately, place the candy canes in a large Ziploc bag and seal tightly. Use a rolling pin to roll/smash the candy canes until they are the size you desire. (I double-bagged them and experimented for each batch, using a rolling pin, hammer and stapler to smash them. The stapler was by far the most effective.)

2. Prepare a cookie sheet by covering it with smooth aluminum foil.

3. Melt or temper the dark chocolate. Pour the chocolate onto the prepared cookie sheet and use an offset spatula or knife to spread it to an even thickness, a little more than 1/8" thick. The chocolate does not have to reach all sides of the sheet, as it will be broken up later anyhow. Place the tray in the refrigerator to firm up while you prepare the white chocolate (I left it in for at least 20 minutes each time).

4. While the dark chocolate hardens, melt or temper the white chocolate. Stir in most of the candy cane bits, reserving about a quarter of the mixture to put on top. (I stir all of them in unless Chatty McHusband is around.)

5. Remove the tray from the refrigerator and spread the white chocolate in an even layer over the dark chocolate.

6. While the white chocolate is still wet, sprinkle the remaining candy cane pieces over the entire surface evenly. Press down very slightly to ensure they stick. Place the tray back in the refrigerator to firm up for 30 minutes.


7. Once the peppermint bark bark is completely set, break into small, uneven pieces by hand.

Source: about.com

Friday, April 29, 2011

Cake Batter Bark

I saw this recipe at the beginning of the year. I didn't make it until this month, though, and I'm posting it today because it's my birthday (eek, I'm 30!). What better recipe for a birthday than one involving cake batter?!

I vowed to my coworker I would make it and share with the department. I had been waiting for a special occasion, thinking it was fancy and involved. But then we had a rough patch at work last month - one of my coworkers had her gall bladder removed (she was admitted to the hospital on her birthday!), I unexpectedly missed a few days of work for the funeral of my grandmother, and our boss took a new job and moved away. This was all during our busiest month of the year, so to say we were stressed is a bit of an understatement.

This bark was just the thing to bring a little light back to our downtrodden souls. It was amazingly easy, very quick and was an absolute hit in the office. The only downsides? It's a tad expensive after you buy the bars of chocolate. It melts quickly - for our purposes at work, presentation was sacrificed for taste as we kept the bark in a bag in the fridge. And to be honest, maybe my "heaping 1.5 teaspoons of cake batter" wasn't heaping enough - the cake batter taste really didn't come through to me. But the sprinkles? Those were cute. And I'm a sucker for white chocolate, so this was a winner for me.

Ingredients:
7 ounces good dark chocolate
12 ounces good white chocolate
1.5 heaping tsp.  yellow cake mix
Colored sprinkles

Directions:
1. Melt the dark chocolate in the microwave, over a double burner, or over low flame. Spread thinly over parchment paper of a silpat. (I just used parchment paper on a cookie sheet.)


2. Cool in the freezer for 20 minutes.

3. Melt the white chocolate. Add the cake mix, stir well. Spread over the dark. (Do a little bit at a time because it will melt the chocolate and it won't look as pretty.)


4. Top with rainbow sprinkles. Freeze for 20 more minutes.


5. Break into pieces and keep in the refrigerator until you are ready to eat it.

P.S. I'll share what I did with the remainder of my cake mix in an upcoming post!

Source: Stephanie Cooks

Monday, February 21, 2011

Brownie Crackles

I wanted a new addition to my Christmas cookie lineup, but with all of the other baking I had to do (for my husband's surprise birthday party, for a coworker's birthday, for work potlucks, etc.), I didn't have time for anything fancy. I just wanted something different and something tasty.


These cookies were a winner, and I have already made them again. They are simple, and they don't taste like your normal cookie - they are kind of like a brownie bite with chocolate chips. In a word: Amazing. I highly, highly recommend these, and I don't even like chocolate that much (I will choose vanilla over chocolate any day).

Ingredients

1 package fudge brownie mix (13-in. x 9-inch pan size)
1 cup all-purpose flour
1 egg
1/2 cup water
1/4 cup canola oil
1 cup (6 ounces) Semi-Sweet Chocolate Chips
Confectioners' sugar

Directions

In a large bowl, beat the brownie mix, flour, egg, water and oil until well blended. Stir in chocolate chips.

Place confectioners' sugar in a shallow dish. Drop dough by tablespoonfuls into sugar; roll to coat. Place 2 in. apart on greased baking sheets.


Bake at 350° for 8-10 minutes or until set. Remove from pans to wire racks to cool. Yield: 4-1/2 dozen.

Nutrition Facts: 2 cookies equals 154 calories, 6 g fat (2 g saturated fat), 8 mg cholesterol, 84 mg sodium, 24 g carbohydrate, 1 g fiber, 2 g protein.

Source: Taste of Home

Monday, January 3, 2011

Chocolate cake turned Calahan Trifle

Many apologies for our short absence! I've been making a lot new recipes, but I haven't had any time to blog them (apparently having a five-month-old and full-time job are a bit time consuming - who knew?!).

Happy new year! And now, back to the recipes :)

Ahhhh, baking disasters. I know you well. But this time, I was not going to let a little blip in my plans get me down.

Before I tell you my sad story, let me enter in to evidence Exhibit A:


It was supposed to be a nice, moist chocolate cake. Actually, the "Best Chocolate Cake EVER."

Alas, it became part of a trifle, aka Exhibit B:


I really think this is one of those mistakes that worked to my advantage. Let me back up. My husband's mother and one of his nephews, Cal, were coming to visit when our daughter was about four weeks old. Cal's birthday was coming up, so I told them I'd make a birthday cake for him. We never get to celebrate his birthday with him, so it was nice to give him his present and a cake a few days before.


I searched a few of my bookmarked recipe sites for a moist chocolate cake recipe, and I came across "THE BEST Chocolate Cake EVER." I decided I had to see if it lived up to its name, so I purchased the ingredients and went to town.

I had such high hopes for this cake, and in the end, they fell flat. The hopes and the cake. The cake ended up being undercooked and gooey in the very middle, which would have been tasty and great (albeit not safe to consume, really) except it kept sinking ... and sinking ...

Finally, I decided the chocolate cake idea had to be scrapped. I had made some Oreo buttercream frosting, but this cake was not going to hold up to being frosted. As I sadly considered letting all of that deliciousness (as well as time and money) go to waste, I started to think about why the cake had been a huge flop.

Unlike many recipes, this one specifically  mentioned NOT to use sugar-free or fat-free versions of the chocolate pudding mix. That was all I had on hand, so I purchased some of the full-sugar, full-fat variety when I was at the grocery store. But I failed to use it, grabbing one of the sugar-free ones I had instead. Sigh. I think this was one of my major problems.

The other problem? I was using a single layer cake pan - it is convenient (less greasing! less dishes!), and I usually don't bake round cakes, so I don't think I have two size-matching layer cake pans. I used this one, which usually takes a little bit longer to bake a boxed cake mix. I added some time to the usual cooking time of 50-55 minutes, and the edges were starting to get *too* crispy, and when I put a toothpick in the center of the cake, it seemed like it was cooked and/or I was hitting spots of melted chocolate chips. I don't think I poked down far enough, and I'm not sure this cake was ideal to be cooking in the single layer pan - there is a lot of stuff to cook through!

I saved the edges of the cake, which were thoroughly cooked. In the end, the only thing that I really lost was the middle of the cake, where it was clear the cake hadn't cooked through.

This cake truly was delicious, and I didn't want to be birthday dessert-less or let the cake go to waste. So I started to brainstorm.

I took the crumbled up chocolate cake, made some chocolate pudding, bought some whipped cream and mini-chocolate chips cookies, as well as the leftover Oreos from the Oreo buttercream I had planned on using to frost the cake, and I layered them. Simple. Sophisticated. Delicious. Disaster-saving.

If you end up making this cake, let me know how it goes!

THE BEST Chocolate Cake EVER :D

1 box devil’s food cake mix
1 package Jello instant chocolate pudding mix
1 cup sour cream
1 cup vegetable oil
4 eggs, beaten
1/2 cup milk
1 tsp vanilla
2 cups mini semisweet chocolate chips

Kevin and Amanda's directions:

Preheat oven to 350 degrees F.

In a VERY large bowl (4 qt), mix together everything except chocolate chips. Batter will be thick. Stir in the chocolate chips. Pour batter into cake pan of choice (I normally use two 9-inch pie pans).

For cooking time, I use the cooking times on the back of the devil’s food cake box as a guide and usually add 10 mins to whatever it says.

Then I do the toothpick check, and if it’s not done, I check on it every 5 mins after that. :) It usually takes around 45 mins for two, 9-inch pie pans.

Source: KevinandAmanda.com

Sunday, May 23, 2010

Red Raspberry Chocolate Bars

We had a potluck at work recently for a co-worker's birthday, and I was in the mood to bake something different. I've been on a major fruit kick lately, so I wanted something that had at least a hint of fruit in it.


I perused the Hershey's cookbook that Kristin bought me last year. Every recipe I've made out of that book has been a home run, so I knew anything I would choose would be a good bet. I came across these "Holiday Red Raspberry Chocolate Bars," and thought they sounded amazing. And why wait until the holidays to enjoy them?!

These are really good. No lie. It's the perfect mix of raspberry and chocolate - neither is too overwhelming. And the crumbly crust with pecans is the perfect complement. You could make these with any kind of jam. I bet cherry would be good.

Ingredients

2-1/2 cups all-purpose flour
1 cup sugar
3/4 cup finely chopped pecans
1 egg, beaten
1 cup (2 sticks) cold butter or margarine
1 jar (12 oz.) seedless red raspberry jam
1-2/3 cups chocolate chips (I used semi-sweet)


Directions

1. Heat oven to 350. Grease 13x9x2 baking pan.

2. Stir together flour, sugar pecans and egg in a large bowl. Cut in butter with pastry blender or fork until mixture resembles coarse crumbs; set aside 1-1/2 cups crumb mixture. Press remaining crumb mixture in pan. Sprinkle with chocolate chips. Crumble reserved crumb mixture evenly over top.

3. Bake 40-45 minutes or until lightly browned. Cool completely in pan on wire rack; cut into bars.

Source: Hershey's Recipe Collection

Friday, April 30, 2010

Chocolate Sugar Cookies

Kristin and I have a new tradition of sending each other baked goods for special occasions, so as her birthday approached, I asked her whether the baby was craving anything in particular. She said chocolate and sugar were high on the list these days.

Chocolate and sugar? Oh, I can certainly work within those parameters!

I went home and poured over some recipe books. I wanted to try something new, but I wanted to make something from scratch (no cake mix this time - I wanted to mix some good, old-fashioned batter!). And it had to be something that would travel well and withstand some potential heat in either AZ or FL.

I wasn't having much luck until I came upon a recipe that I had printed out and saved years ago but never got around to making: Chocolate Sugar Cookies.

Uh, chocolate? Check. Sugar? Check. Perfect!

These are sort of a chocolate version of Mike's Nana's roll-out cookies. They're a thinner, crispier sugar cookie. They're very light, and a nice summer treat when you want something chocolaty but not too heavy.

Ingredients

  • 3/4 cup shortening
  • 1 cup white sugar
  • 1 egg
  • 1/4 cup light corn syrup
  • 2 (1 ounce) squares unsweetened chocolate, melted
  • 2 cups all-purpose flour
  • 1/4 teaspoon salt
  • 1 teaspoon baking soda
  • 1 teaspoon ground cinnamon

Directions

  1. Preheat oven to 350 degrees F (175 degrees C).
  2. In a large mixing bowl, cream shortening, sugar, and egg. Stir in syrup and melted chocolate. Sift flour, salt, baking soda, and ground cinnamon; add to creamed mixture. Chill 1 hour.
  3. Roll dough 1/8 inch thick on a well-floured pastry cloth. Cut into shapes.
  4. Bake on an ungreased cookie sheet for 10 to 12 minutes.
Source: allrecipes.com


My notes:

1. While I think these are good, I personally prefer a thicker, chewier sugar cookie. Mike prefers them like this. To each their own! If you're a thin, crispy kind of cookie person, these are definitely for you. Next time, I might try to make them a little thicker and cook them the same amount of time to see if they come out a little chewy.

2. The recipe says to bake them for 10-12 minutes. I found that 9 minutes was plenty in my oven. They get overdone very easily, so keep a close eye on them.

3. Kristin informed me that these traveled very well! I lined a container with wax paper, layered the cookies in and stuck paper napkins between each pile, so they wouldn't bump into each other and break too much. Then I topped it off with a couple of paper towels to cushion the top, and sent them off.

4. This batch of cookies made me realize that I really need to invest in some non-holiday cookie cutters. My only two options were stars and cats. Pretty pathetic.

Monday, March 29, 2010

Chocolate Brownies

A few weeks ago I wanted to bake something different. Something without cake mix. Something a little out of my comfort zone. I was thinking of cupcakes but hadn't really found a recipe that excited me ... and then I stumbled on these brownies.

These were really, really good and totally hit the spot. Were they as fudgy as my pregnant brain wanted them to be? No. They are definitely very cake-y, the kind of brownies that you want to eat with a tall glass of milk nearby. Were they all chocolate sweetness? No. But they were good, and it was nice to make something that required more than just a box, two eggs and a half a cup of oil.

Meghan and I had a college professor who is known for her Turtle Brownies. When I spotted this recipe, I thought for sure I'd found something comparable to the yummyness that is the infamous Turtle Brownie. The college professor was not convinced, and rightly so. These are good, but they are no where close to the Turtle Brownie, which I've decided we will now need to make and share with you in a future post.

Chocolate Brownies:

4 ounces (120 grams) unsweetened chocolate, coarsely chopped

1/2 cup (113 grams) unsalted butter, cut into pieces

1 cup (200 grams) granulated white sugar

1 teaspoon pure vanilla extract

2 large eggs

3/4 cup (95 grams) all-purpose flour

1/4 teaspoon salt

Chocolate Ganache:

3 ounces (90 grams) semi sweet chocolate, chopped

1/3 cup (80 ml) heavy whipping cream

1 tablespoon (14 grams) unsalted butter

Chocolate Brownies: Preheat oven to 325 degrees F (165 degrees C) and place rack in center of oven. Butter, or spray with a non stick vegetable spray, an 8 inch (20 cm) square baking pan.

Melt the chocolate and butter in a large stainless steel bowl placed over a saucepan of simmering water. Remove from heat and stir in the sugar. Next, whisk in the vanilla extract and eggs, one at a time, beating well after each addition. Finally, stir in the flour and salt.

Pour into the prepared pan and bake for about 25 minutes, or until a toothpick inserted in the center comes out with a few moist crumbs. Remove from oven and let cool on a wire rack.


Chocolate Ganache: Place the chopped chocolate in a medium sized stainless steel bowl. Heat the cream and butter in a small saucepan over medium heat. Bring just to a boil. Immediately pour the boiling cream over the chocolate and allow to stand for 5 minutes. Stir with a whisk or spoon until smooth. Let cool to room temperature and then spread the ganache over the brownies. I like to store these brownies in the refrigerator. They can also be frozen.

Makes 16 brownies.

Source: Joy of Baking

Sunday, January 10, 2010

Neapolitan Bundt Cake

I was originally going to make this cake a few weeks before I actually made it ... but I realized that although I had everything else to make it, I lacked the white cake mix. And I didn't think yellow would be a good substitute.

So I got the white cake mix and made it for a holiday potluck at my husband's office. It was quite unusual, very moist and delicious.

I made a few modifications based on the comments on allrecipes.com. I used 1 1/2 teaspoons of strawberry extract instead 1 teaspoon, added 1/8 cup strawberry preserves to the strawberry mixture, and increased the chocolate syrup to 1/3 cup.

I wasn't all that impressed with the chocolate glaze, either. It was very runny, and I think if I made this cake again, I'll melt some chocolate chips to drizzle over the cake or even just dust it with powdered sugar.

Ingredients

1 (18.25 ounce) package white cake mix
1 cup water
1/4 cup vegetable oil
3 eggs

1 teaspoon strawberry extract (I used 1 1/2 teaspoons)
(I added 1/8 cup strawberry preserves)
1/4 cup chocolate syrup (I used 1/3 cup)
3 drops red food coloring
2/3 cup confectioners' sugar
3 tablespoons chocolate syrup


Directions

1. Grease and flour a 12-cup bundt pan. Preheat oven to 350 degrees F (175 degrees C).


2. Blend the cake mix, water, oil, and eggs on low speed until moistened. Beat 3 minutes on medium speed. Pour 1/2 of the batter into the bundt pan.


3. Measure 1/2 of the remaining batter into a small bowl and stir in the strawberry extract and food color (as much as you want to make a pretty, dark pink color). This is when I also added the strawberry preserves. Carefully pour this into the pan.


4. Stir 1/4 (I used 1/3) cup chocolate syrup into the remaining batter and carefully pour this into the pan on top of the strawberry batter.

5. Bake for about 40 minutes in a 350 degree F (175 degrees C) oven. Cool 15 minutes.

6. Remove from pan and drizzle chocolate glaze over the top.


7. To make chocolate glaze: Mix together confectioners' sugar and 3 tablespoons chocolate syrup until smooth. If necessary, a few drops of water or a small amount of additional confectioners' sugar may be added until the desired consistency is obtained. Drizzle over top of the bundt cake.

Source: allrecipes.com

Tuesday, December 29, 2009

Heavenly Chocolate Layer Pie

I had a graham cracker pie crust leftover from Thanksgiving that I wanted to use, and when we decided to have a holiday potluck at office, I decided I'd find an easy, light pie to put in it.

I made a few modifications to this recipe, though. I couldn't find chocolate whipped cream (I've seen it before, but I didn't launch an all-out search for this recipe) and I used the graham cracker pie crust instead of the Oreo one. I think all of the extra chocolate would have been delicious, but I don't think it was necessary.

The pie was a hit at the potluck, and even though it's not overly fattening, it's very rich, and a little bit went a long way. And there are no photos, because it was *so* easy to make I didn't really have any time or need to photograph the steps. I wanted to get a photo of the finished product, but it was gone before I could!

Ingredients:
2 cups cold milk
2 pkg. (4-serving size each) Chocolate Instant Pudding
1 Oreo pie crust (6 oz.)
1 tub (8 oz.) Chocolate Whipped Topping, thawed, divided

Directions:
Pour milk into medium bowl. Add dry pudding mixes. Beat with wire whisk 2 min. or until well blended. (Mixture will be thick.)

Spread 1-1/2 cups of the pudding onto bottom of crust. Gently stir half of the whipped topping into remaining pudding. Spread over pudding layer in crust; top with the remaining whipped topping.

Refrigerate 3 hours or until set. Store leftover pie in refrigerator.

Source: Kraft

Sunday, July 26, 2009

Chocolate Cherry Chaos Cake

I'm hoping to visit my grandmother this week, so in honor of her, I wanted to share this recipe. Grandma used to make this cake for my sister's birthday, and it's SOOOO easy to make. The cake itself isn't very unhealthy (moisture from the pie filling and eggs, not oil or butter), but the icing is not exactly the most nutritious. It's moist, makes a lot o' cake and is super easy. We always called it chocolate cherry cake, but I renamed it Chocolate Cherry Chaos about three years ago.


Ingredients:
1 box Devil's Food Cake Mix
1 can cherry pie filling
2 eggs, beaten
1 teaspoon almond flavoring (optional)

Frosting:
1 cup granulated sugar
5 tablespoons butter
1/3 cup milk
6 oz package (it's one cup, I use half a 12 oz. package) of semisweet chocolate chips

Directions:
Mix cake mix, cherry pie filling, eggs, and flavoring by hand. Pour batter into greased and floured 13x9x2-inch pan and bake at 350° about 30 minutes, or until a wooden pick or cake tester inserted in center comes out clean. (I use a 10X15 jelly roll pan and bake for 20-30 minutes.)

After I remove the cake from the oven, I start the frosting. For frosting, place sugar, butter, and milk in a saucepan. Bring to a boil stirring constantly. Boil for one minute. Remove from the heat and stir in chocolate chips until smooth. Pour over warm cake.

Source: Grandma

Sunday, July 5, 2009

Cookie Pizza

My husband's coworkers had a poker party a few weekends ago, and I volunteered to provide some baked goods. I wanted to try something new, and I found something that I will definitely be making again: Cookie Pizza. This was also one of the few baking successes I had that week, so it's especially near and dear to my heart now.


I was unsure of the "sauce" at first, but after trying it, I'm convinced. This stuff is good. And it was easy to make. My only issue was the amount I could make - I wasn't close to two circular pizzas, but the one 13x9 pizza I made went quickly, and the "crust" wasn't too thick. I think I'll make it again with the 13x9 format. I think other toppings could easily be added or substituted, too.

Ingredients:

1 (18-ounce) package refrigerated sugar cookie dough

2 cups (12 ounces) semisweet chocolate chips

1 (14-ounce) can sweetened condensed milk (not evaporated milk)

2 cups candy-coated milk chocolate pieces (like M&Ms)

2 cups miniature marshmallows

1/2 cup peanuts


Directions:

1. Preheat oven to 375 degrees. Divide cookie dough in half; press each half onto ungreased 12-inch pizza pans. (I used 16.5 ounces of cookie dough and baked it in a single 13x9 pan.) Bake 10 minutes or until golden. Remove from oven.

2. In medium saucepan, melt chocolate chips with sweetened condensed milk. Spread over crust(s). Sprinkle with chocolate pieces, marshmallows and peanuts.

3. Bake 4 minutes or until marshmallows are lightly toasted. Cool. Cut.

Tuesday, June 30, 2009

S'mores bars

It's been a dicey baking week for me. I've come out on top, but battered and bruised. I tried three new recipes this week, and two might never make it back in the baking rotation. The s'mores bar recipe is one of them.

It seemed so promising - easy, quick and s'mores-y. But alas, things went downhill. It started when I melted the chocolate chips in the microwave ... and the bag melted with them. Then, when I tried to use a different bag, the chocolate burned my hand. And then it didn't even "drizzle." It was more of a plop, plop, plop (see photo below). If I ever make these again, I think I will just use Hershey's syrup - it will be cleaner, yummy and not burn me or make a mess of my microwave.

After the melted chocolate fiasco, I followed the instructions and put the bars in the fridge. Then I made the colossal mistake of trying to cut them. Have you ever tried to cut melted marshmallow? The top, marshmallow-y portion kept separating from the bottom cookie-dough-and-graham-crackers part. The only thing I can think that caused this might be the fact that I didn't feel that 1/4 cup graham cracker crumbs was really going to provide enough graham cracker taste to the s'mores bars. So I doubled it. And maybe the extra 1/4 cup prevented the marshmallow adhering to the cookie dough layer, so that the marshmallow simply stuck to the graham cracker crumbs and peeled away from the cookie dough. Or maybe melted marshmallow is just not meant to be cut. But back to the recipe ...

Ingredients:
1 package (18 ounces) refrigerated chocolate chip cookie dough
1/4 cup graham cracker crumbs (I used about 1/2 cup, which might have been problematic)
3 cups mini marshmallows
1/2 cup semisweet or milk chocolate chips
2 teaspoons shortening

Directions:


1. Preheat oven to 350°F. Grease 13X9-inch baking pan. Press dough into prepared pan. Sprinkle evenly with graham cracker crumbs.


2. Bake 10 to 12 minutes or until edges are golden brown. Sprinkle with marshmallows. Bake 2 to 3 minutes or until marshmallows are puffed. Cool completely in pan on wire rack.


3. Combine chocolate chips and shortening in small resealable food storage bag; seal. Microwave on HIGH 1 minute; knead bag lightly. Microwave on HIGH for additional 30-second intervals until chips and shortening are completely melted and smooth, kneading bag after each 30-second interval. Cut off small corner of bag. Drizzle over bars. Refrigerate 5 to 10 minutes or until chocolate is set. Cut into bars.

Source: Favorite Brand Name 3 Books in 1: Cookies, Bars, Muffins

Tuesday, June 23, 2009

Mint chocolate brownies

I think that even people who love to bake like to use a mix now and again ... and last week, I wanted to bake, I didn't want to mess with finding something that I had all the ingredients for, and I knew I had a mix in my cupboard that was screaming to be used.


I present to you the Pillsbury Mint Chocolate brownie mix for review. And with that, I give you my praise of it. The mix was simple - your typical mix+eggs+water+oil=brownies! The minty syrup drizzled on top of it? Also simple. And also delicious. The brownies were extremely moist, the mint flavor wasn't overpowering, and the brownies did not last long in the newsroom. If you're looking for something easy, some fast and something slightly more exotic than your standard brownie mix, this is perfect. The only drawback? It was one of those "8x8 or 9x9 pan" brownies, while I enjoy myself a heartier 9x13 brownie mix (not for myself, mind you, but for the sake of making more to share!).

Overall, I give this mix two thumbs up.

Thursday, May 21, 2009

Cookie Dough Cupcakes

A coworker of mine had mentioned cookie dough cupcakes to me a few months ago, and I thought they sounded fantastic. Fantastically yummy. And fantastically complicated. Surely, to get the taste of cookie dough IN a cupcake, you must have specials skills, tools, talents, ingredients, powers, right?

No.

I have none of the above (aside from the ability to roll my tongue, which some might consider a special talent). And I made them and will do so again and again.

I must be on a cookie dough kick this week. I made these for the birthday of one of Tim's coworkers. The actual cupcake part of this treat was the most moist thing I have ever eaten. It was amazingly easy to make these, and some people called it the best thing I have ever made, which is an observation I do not take lightly.

One of Tim's coworkers told me he microwaved one for a few seconds and it tasted exactly like a cupcake and cookie dough. As you'll see from my notes below, next time I make these I'm going to make some small modifications to have them be more "gooey cookie dough center" instead of "fairly baked cookie dough crust." People seemed to love the fact that they had NO IDEA there was cookie dough coming until they bit in to one.

Makes 22 to 24 cupcakes (2 1/2 inches each)
Preparation time: 15 Minutes
Baking time: 23 to 27 Minutes
Assembly time: 10 Minutes

Ingredients:

24 paper liners for cupcake pans (2 1/2-inch size)
1 package (18.25 ounces) plain yellow cake mix
1 package (3.4 ounces) vanilla instant pudding mix
1 cup whole milk
1 cup vegetable oil
4 large eggs
1 teaspoon pure vanilla extract
1 package (1 pound) frozen cookie dough (see "the Cupcake Doctor says" below)
Frosting (Cupcake Doctor recommends homemade chocolate buttercream, I used store-bought frosting)

Directions:

1. Place a rack in the center of the oven and preheat the oven to 350 degrees F. Line 24 cupcake cups with paper liners. Set the pans aside.


2. Place the cake mix, pudding mix, milk, oil, eggs, and vanilla in a large mixing bowl. Blend with an electric mixer on low speed for 30 seconds. Stop the machine and scrape down the sides of the bowl with a rubber spatula. Increase the mixer speed to medium and beat 2 minutes more, scraping down the sides again if needed. The batter should look well blended. Spoon or scoop a heaping 1/4 cup batter into each lined cupcake cup, filling it two thirds of the way full. (You will get between 22 and 24 cupcakes; remove the empty liners, if any.) Cut the frozen dough pieces in half to make 24 pieces. Place a frozen cookie dough piece on top of each cupcake (see "Kristin I. Cupcake Maker says" below). Place the pans in the oven.


3. Bake the cupcakes until they are golden and spring back when lightly pressed with your finger, 23 to 27 minutes. Remove the pans from the oven and place them on wire racks to cool for 5 minutes. Run a dinner knife around the edges of the cupcake liners, lift the cupcakes up from the bottoms of the cups using the end of the knife, and pick them out of the cups carefully with your fingertips. Place them on a wire rack to cool for 15 minutes before frosting. They may sink a bit in the center.


4. Frost and serve!

Store these cupcakes, in a cake saver or under a glass dome, at room temperature for up to 3 days or in the refrigerator for up to 1 week. Or freeze them, wrapped in aluminum foil or in a cake saver, for up to 6 months. Thaw the cupcakes overnight in the refrigerator before serving.

The Cupcake Doctor says...

If you use the 18-ounce logs of refrigerated chocolate chip cookie dough (instead of the 1-pound packages of frozen dough), cut them into 24 equal pieces and freeze them before using them in this recipe. It's important to use frozen dough, because you don't want it to bake completely and become a cookie. You want the center to be gooey when you bite into it.

Kristin I. Cupcake Maker says ...
Link
I used the 18-ounce log and froze it first. When I make these again, I am going to keep the pieces frozen til the last possible second. In the little time I needed to cut the frozen log, I think it defrosted just enough to start baking and become a cookie while in the cupcake. When I make them again, I'm going to push the piece of cupcake dough in to the cupcake because it seemed to just bake at the top instead of become a gooey ball inside of the cupcake. It made for a yummy cookie dough topping, but it wasn't the gooey center I was expecting.

Source: The Cake Mix Doctor

Monday, May 18, 2009

Chocolate Chip Cookie Dough Dip

I had almost forgotten about this little gem over on Heather's blog. But when I went hunting for the Oreo cupcake recipe, it jumped out at me again and screamed, "Make me for craft party!" Never one to argue with reason (or yelling imaginary voices), I decided to make it for May's craft gathering.

As I was making it, I worried about each step and if I was dissolving the brown sugar enough, if the mixture was cooled enough, if my dip was very liquid-like. Therefore, I did not take many photos. But for all of my paranoia, this dip turned. out. GOOD. It really did taste like cookie dough, but without the salmonella threat of raw eggs. It held it's own with the spectacular selection of food and desserts that the girls brought - it was, by far, one of our finest food offerings EVER.

Because I am always looking for ways to cut calories, I served it with reduced fat graham crackers and reduced fat vanilla wafers.

Ingredients:
1/2 cup (1 stick) butter
(I used I Can't Believe It's Not Butter For Cooking and Baking)
1/3 cup brown sugar
1 tsp. vanilla extra
1 (8 oz.) package cream cheese, softened (I used reduced fat cream cheese)
1/2 cup confectioner's sugar
3/4 cup mini semi-sweet chocolate chips

Directions (with Heather's notes below):
1. In a small sauce pan, melt butter and brown sugar over medium heat. Stir continuously until the brown sugar dissolves.


2. Remove from heat and whisk in vanilla extract. Set aside to cool.


3. Beat the softened cream cheese and confectioner's sugar for 1 minute.


4. Slowly beat in the cooled butter/brown sugar mixture. Beat for an additional minute.


5. Stir in the chocolate chips.


6. Pour mixture into serving bowl and refrigerate. (Note: The mixture will be very liquid-like at first. Refrigeration is necessary to make it a better consistency. If you are running short on time, you can also throw the mixture into the freezer for a little bit.)


7. Garnish with additional chips (optional).


(Another note: After refrigeration for an extended period of time, your dip will be very solid and un-dippable--your wafers or graham crackers will break! To achieve the best consistency, remove from the refrigerator 15-30 minutes prior to serving.)

Source: Heather's blog

Monday, May 11, 2009

Oreo cupcakes with Oreo buttercream

Full disclosure: I am not a big cupcake person. I am realllly not a big chocolate person. Give me vanilla any day, but chocolate is usually not something I crave/request/desire.

This being said, I have no idea how I arrived at wanting so desperately to make the Oreo cupcakes I've seen on Heather's blog.

Tim went to a Guitar Hero party this weekend, so I volunteered (OK, demanded that I be allowed) to make something. A girl has got to blog, after all.

So I used the recipe that Heather found/adapted and had great success. I even purchased a teeny-tiny food chopper for the Oreos. (This was the highlight of my week.) The only issue I had was that I made 24 cupcakes, like Heather did, but I had a little bit of batter left over and put it in a pie pan. But the cupcakes still overflowed. I think I could easily have made 30 cupcakes and still had batter left over. Next time I make these I will not fill the cupcake tins so full, and I will make more of them. I think I also need a new decorating tip for the frosting, but that was a minor detail for this time around. Half of the cupcakes were delivered to Tim's party and half went to my coworkers.

I'm not going to kid you. The Oreo buttercream? DE-LIC-IOUS. I didn't have any vanilla, though (I ran out the day before, I swear!), so I used 1/2 teaspoon of Wilton butter flavoring and 1/2 teaspoon of almond extract.

A good tip from Heather that I didn't see until after I made my cupcakes: Cut your Oreos in half to garnish the cupcakes FIRST. Some will crack or break and not split in to perfect halves, so you can use the cracked/broken ones to grind up for your cake batter and buttercream instead of wasting them. (I found it handy to pop 'em in my mouth if they were broken, but I think Heather's approach is better for my waistline.)

I'm also going to use the cake recipe for a baby shower I'm co-hosting early next month. (I'm doing a chocolate cake and a vanilla cake, and I have some leads on some mighty promising vanilla cakes.) And I'm making another recipe from Heather's blog for the craft party I'm hosting next weekend. Get. Excited. And that's just what I have PLANNED, not including spontaneous baking that might appear in the blog!

Hershey's "Perfectly Chocolate" Chocolate Cake

(Source: Hersheys.com)

Ingredients:
- 2 cups sugar
- 1 3/4 cups all-purpose flour
- 3/4 cup HERSHEY'S Cocoa
- 1 1/2 teaspoons baking powder
- 1 1/2 teaspoons baking soda
- 1 teaspoon salt
- 2 eggs
- 1 cup milk
- 1/2 cup vegetable oil
- 2 teaspoons vanilla extract
- 1 cup boiling water
- 8-10 Oreo cookies, crushed or put through food processor (optional) - Heather's addition

Directions:
1. Heat oven to 350°F. Grease and flour two 9-inch round baking pans (For cupcakes or other pan sizes, see variations listed below.)


2. Stir together sugar, flour, cocoa, baking powder, baking soda, Oreo crumbs and salt in large bowl. Add eggs, milk, oil and vanilla; beat on medium speed of mixer 2 minutes. Stir in boiling water (batter will be thin). Pour batter into prepared pans.

3. Bake 30 to 35 minutes or until wooden pick inserted in center comes out clean. Cool 10 minutes; remove from pans to wire racks. Cool completely.

VARIATIONS:
ONE-PAN CAKE: Grease and flour 13x9x2-inch baking pan. Heat oven to 350° F. Pour batter into prepared pan. Bake 35 to 40 minutes. Cool completely. Frost.

THREE LAYER CAKE: Grease and flour three 8-inch round baking pans. Heat oven to 350°F. Pour batter into prepared pans. Bake 30 to 35 minutes. Cool 10 minutes; remove from pans to wire racks. Cool completely. Frost.

BUNDT CAKE: Grease and flour 12-cup Bundt pan. Heat oven to 350°F. Pour batter into prepared pan. Bake 50 to 55 minutes. Cool 15 minutes; remove from pan to wire rack. Cool completely. Frost.

CUPCAKES: Line muffin cups (2-1/2 inches in diameter) with paper bake cups. Heat oven to 350°F. Fill cups 2/3 full with batter. Bake 22 to 25 minutes. Cool completely. Frost. About 30 cupcakes. (Note from Heather: I filled my muffin cups about 3/4 full to get bigger cupcakes, so I only got 24 out of the recipe.)

Oreo Buttercream

Ingredients:
- 1 cup shortening or butter (I use shortening so it doesn't have to be refrigerated)
- 1 tsp. vanilla extract
- 2 tbsp. water
- 1 lb. confectioner's sugar (if you don't have a scale, it's approximately 4 cups)
- 1 tbsp. meringue powder
- 12-14 Oreos, finely crushed in food processor

Directions:
1. In bowl of stand mixer, cream shortening, vanilla, and water.

2. Add confectioner's sugar, meringue powder, and crushed Oreos. Mix until well combined.


3. At this point, your frosting will be very thick. To top cupcakes, it's better to have medium to thin consistency icing, so you'll have to add more water. I probably added another 2-3 tbsp. to get the desired consistency, but you'll want to add the water little by little to make sure you don't add too much. When it's the right consistency, it should be pretty easy to stir by hand (think about whether you'd be able to easily squeeze it out of a piping bag). If you accidentally make it too thin (runny), add more confectioner's sugar.

Once cupcakes were completely cool, use a piping bag to add a decorative swirl on top of each one. Then push one half of an Oreo cookie into the frosting for garnish.

Tuesday, April 28, 2009

Moon Rocks

I have a few recipe books that I absolutely adore. One of them is from the "3 Books in 1" series - Cookies, Bars and Muffins. My good friend Jen gave me this book for Christmas 2006, and I've gotten a lot of use out of it. You'll likely see me post a lot of recipes from that book on this blog.

Julia borrowed the book when she was looking for a cookie recipe for a Christmas cookie exchange. She tried a cookie called "Moon Rocks." The cookies were yummy, but they were flat, and she knew why - the recipe called for cake mix with pudding in the mix. She wasn't using cake mix with pudding in the mix.

For Julia's Signing Day, I decided to recreate the Moon Rocks. I made sure I got a cake mix with pudding in the mix. It was fun - if you want to work out some aggression on a cookie, this is your answer. You get to smash up some pretzel sticks! But that's where my recommendation of this cookie ends. I don't know why, but it was one of the most dry, almost stale tasting cookies I've ever made/eaten. It might have been a fluke, but it just didn't taste fresh.

My sister had told Meghan and I she wanted us to send her samples of our baked goods. We told her if she joined the blog as a "follower" (see the section on the lower right side of our blog - hi followers!) we would send her food. I threw a few of these cookies in to a plastic bag and mailed them to her to thank her for supporting the East to West Bakers. I had little faith that they would not end up crushed and squished merely because I didn't really pack them all that well. Marti reported that they were, in fact, "pulverized." But, she admitted, they were also rather dry. "But still delicious!" she said.

But dry.

I don't like dry cookies. And I'm not quite sure why this recipe produced dry cookies. I will share it with you for the mere reason that maybe you will recreate them and they will be grand and you can tell me what a silly blogging baker ninny I am.

Ingredients:

1 package (18-1/4 ounces) devil's food or German chocolate cake mix with pudding in the mix
3 eggs
1/2 cup (1 stick) butter, melted
2 cups slightly crushed (2-1/2-inch) pretzel sticks
1-1/2 cups uncooked old-fashioned oats
1 cup swirled chocolate and white chocolate chips or candy-coated semisweet chocolate baking pieces

Directions:
Preheat oven to 350°F. Blend cake mix, eggs and butter in large bowl. Stir in crushed pretzels, oats and chocolate chips. (Dough will be stiff.)


Drop dough by rounded teaspoonfuls about 2 inches apart onto ungreased cookie sheets.


Bake 7 to 9 minutes or until set. Let cookies cool on cookie sheets 1 minute; transfer to wire racks to to cool completely.


Source: Favorite Brand Name 3 Books in 1: Cookies, Bars, Muffins

Blogger template 'PlainFish' by Ourblogtemplates.com 2008